Showing posts with label paper crafting. Show all posts

4/18/2019

Some long overdue Easter greetings

This blog is full of excuses for long periods of silence, but - as mentioned before - I consider using Instagram as my communication platform instead, and keeping the blog as a kind of projects library? Well, all this is stuff I think of in spare time, of which I sometimes don't have much.
I'm sure my readers have exactly the same kind of everyday issues....

Easter is upon us, and I actually always feel like colours and flowers and letting all that light in through the windows again - and making pretty things as decorations for Easter parties, or to give away with Easter eggs. This year I made these simple butterflies, they are perhaps the most basic origami I have ever shared here. Great for kids to make, or for impatient types like me. Or you?


I made bundles of them, and stuck a bit of thin wire through them, and put them on branches from our cherry trees, and it looked very charming. I did a small origami workshop in my workplace at the book shop, and several kids came by and folded with great enthusiasm. We used origami paper from Djeco, as seen in the photo, since we sell their really cool line of paper products. 

But maybe you feel like revisiting some of my older spring projects? 

There were the Sakura flowerballs - also made in a Buttercup version.
Last year, I made these colorful pleated Easter Egg Lanterns - and many of you liked those Cheerful Little Birds.

You can use my tag cloud to explore, there are plenty more. 
Have a lovely Easter or - if you don't celebrate Easter - simply a lovely spring!

12/21/2018

Flaky Friday


We are not having a white Christmas here, that's for sure (and it is very rare), but this is a way of compensating: complicated looking (but easy to make) end three dimensional paper snowflakes. These are rather large decorations, and they look especially nice in a window, I think - plus they are the kind of pretty things you may want to leave there, even after Christmas. 

They are printed on heavy paper or card stock, and the trick is all about cutting slits and folding the pieces correctly, and these cool paper sculptures are quite simple to make. 


So give them a try - or check out some of the other posts I have done on snowflakes, that are a bit of a thing for me, I guess...


12/14/2018

Flat Fun Friday

As you know, I'm very fond of making Fröbel Stars, so much in fact, that I dedicated a lot of hours, trying to describe and demonstrate as many variants as I know, in this post, an absolute go-to spot for Fröbel enthusiasts. 

Because I like making them, I buy lots of those ready made strips, that are so abundantly available in the Christmas season here in Denmark. They come in so many pretty patterns and colors, and I have amassed quite a boxful. 

So, I like to play around with them, and come up with alternative ways of using them. These Flat Weave Stars I originally made in 2013. Back then I made special color/pattern strips for them (you can still download and use those, of course). 

The ones in these photos, I made last night, from some of the different Fröbel strips I had. Because a Fröbel star needs four strips, you eften end up with 'leftovers' in certain designs, and these are just made from a mix of whatever was there.

For each of these you'll need eight half length strips


The tutorial explains the very simple principle, and the easiest way to make them (the folded strips laid out flat on the table and then woven, hence the name). I made them with 2 x 4 strips, but you could make them larger, smaller, or not even square - experiment, and have a happy Advent 3rd!


Update - I made this last one, seen below, and I thought it might be nice to add that image as well.

As you can see, this was made with 2 x 6 strips, and you could make them very large, as long as the number is even, and the strips have a little extra length for maneuvering. They're quite fun to make!


12/07/2018

It's Concertina Friday!

Today's blog throwback is all about concertina folding, as I like to call it. Something I like to do, even though it can be a bit fiddly to turn into a flat, round ornament - but with a bit of patience and practise it is super easy. It's perfect for gorgeous flowers and stars, I think, and it doesn't involve a lot of thinking or complicated folding sequences - all you have to do is make a whole lot of really, really sharp and even folds. 

The Solino Stars (top) and the Dip Dye Flowers (middle) are both from 2013. They both include a perfectly finished design to download, which you only have to print, cut and fold. Both blog posts have a few bits of practical advice on the how-to.

The Gold Stars (bottom) post from 2016 is a kind of tutorial in itself, explaining the easiest way to make something like this - tried and perfected by me, and it involves making a little tool for super quick and accurate folding. These gold ones are made from thin, glossy gift wrap, which I find particularly suited for this kind of folding.

Have a lovely weekend, everybody!

11/30/2018

Have a Heart on Advent 1st

Let's kick December off (well, almost) with one of the very first designs I made for this blog: The Countdown Heart from 2011, from the original Advent Calendar format, where I posted a new heart every single day in December (all of them woven hearts, as these are a traditional and very old Danish Christmas decoration). I was on maternity leave and had more time for blogging back then!
You can read a bit about weaving hearts here. I also made a simple one page tutorial.


But I wanted to post an origami heart as well, and I found that these (seen on the dark background in the photos), originally made for Valentine's in 2017, are great for Christmas as well. They can be used as gift tags, mini Christmas cards or made into a really cool garland (see photo - they have a natural slit on one side, that you use for the ribbon) - and if you punch a hole for a bit of string, you could decorate your tree with them. 

They are super easy to make, and a fun origami design - note: made not from a square paper, but from a rectangular one. Which is why I did a whole series of measured papers, ready to cut and fold, in a lot of funky red / pink / coral patterns. 


This is what the Countdown Heart looks like (below), before you weave it - and if you have never woven a Christmas heart before, now would be the perfect time to start!


11/23/2018

Multi Color Friday

Back in 2014, I made this very large and colorful paper bauble for the blog.

It's a very simple design, a sphere made from twenty circular paper units, each of these folded into a triangular shape (and as usual, to make it as easy as possible, I even made the folding lines for you). 

A really fun and intriguing construction, and one that could easily be made in any kind of slightly sturdy paper, that might take your fancy - but I liked the idea of a patchwork multi-pattern bauble. Now, to un-celebrate the ghastly Black Friday, lets give it a rerun this year!

Here is a link back to the original post from December 2014, with a series of step-by-step images, explaining how to make it (all you need is scissors and glue), and of course, the link to the original design PDF. 

Throwback Christmas project # 1: The Big Patchwork Bauble


3/23/2018

Pleated Easter Eggs

Pleating is not origami, but another great way to manipulate paper into strong three dimensional objects, and this year's Easter DIY project, is fun to try, if you have never tried pleating before. 

There is only one horizontal pleating line in this design - and I have made it super easy for you, because all the necessary lines are clearly marked on the design.

I made six different designs for these Easter egg like little lanterns, and I have made some variations to them, by pleating along different lines, and turning them some of them - so some are egg like, others more hot air balloon like, if you see what I mean. 

Download the pattern sheets:  Design 1  /  Design 2  /  Design 3

I also made you a little tutorial, with some photos showing the process and a few bits of advice. Pleating is hard to explain, it has to be tried and experienced - and then it becomes easy!

Download my How-to-Pleat-Easter-Eggs tutorial:  Page 1  /  Page 2

I went a bit color crazy - I long for spring and warmth and sun - and these are a bit more circus and carnival than traditional Easter decorations, but perhaps you feel the same?

Have a colorful Easter, and happy folding and pleating!


2/14/2018

Almost a tradition: Valentine's Origami

The last couple of years, I have done a Valentine's origami project for the blog, where I have done special patterns, tutorials and such, but this year I have been too busy. 

The other evening I did try these three dimensional puffy hearts, though, and they were fun to make. I found them on the Paper Kawaii YouTube-channel - a really great place to go, if you like origami. The instructions are very well produced and super easy to follow. 

Have a cosy, or perhaps even romantic, February 14th. Be good to someone, maybe especially yourself!

Go check out the flat origami hearts from last year - or perhaps the Hidden Heart origami letters from 2016. That year I also posted some Valentine's themed traditional Menko and Tato folded origami letters.

12/23/2017

Magic Snowflake Paper Toy

For all the impatient kids who are tired of bending over their their iPads or TV-shows (and perhaps even some of their parents?), I have this little Christmas present. If you have never had a kaleidocycle in your hands, it's about time you did. This is a cunning little paper construction, and easy to build yourself - and I have made you one with festive and seasonal snowflakes. 

All you have to do is download this design, print it on regular paper (perhaps the heavier quality, if you have it), cut, trace and glue. I took a few photos to show you - see the mini-tutorial here. 

It folds endlessly into itself, giving you lots of time to think of something nice and relax for a bit. Think of it as a very low tech fidget spinner, and even something you might decorate the seasonal table with. 

I even made you a primitive GIF to show you how it works.....

Happy Lillejuleaften as we say in Danish - or 'Little Christmas Eve'


12/15/2017

Upside Down Origami

Are they flowers? Or a kind of three dimensional stars? Should you hang them this way - or that? 
I really couldn't say. You decide. 

But they are easy and quick to make, and for these I had some fun with a pile of old magazines I was taking to the recycle dumpster, but absentmindedly stood around leafing through. And I just saw all these nice colours and textures, and started ripping pages out. 

Dusty or fleshy pink is still unavoidable it seems, and that's all right with me. 

I put together a tutorial for you, so go get it right here, and get started on the little thingys. They take about five minutes to make, and would be fine for kids or origami novices. 
 
2021: I have a new location for my downloads, please go here for the tutorial:
page 1  /  page 2  /  page 3

Hope you'll have fun with them, have a great weekend!


12/08/2017

Japanese Quilt Stars

The Christmas project for you this weekend, are these cool stars. I named them Japanese Quilt Stars, because they look like the stars often used in traditional quilts - and I made you special print-and-cut paper sheets for these, with lots of Japanese vibe. 

They are surprisingly simple modular (6 unit) origami stars - not made from square papers, but from rectangular ones. I have made you some very easy to use sheets for printing and cutting, crop marked for your convenience. With my sheets a star like this is about 18 centimeters across.

My sheet-designs are for printing on both sides, because this design really displays both sides of the paper (and they have a very pretty and completely different looking backside....)

To print these sheets (four small sheets per A4, and you need six units for one star) on both sides, set the printer to print 'page 1 only'. Then grab your sheets from the 'out'-tray, turn them over, put them in the feed tray blank side up, and print again, this time set to 'page 2 only'. I do this all the time, because of my obsession with designing my own origami paper, which - of course - is so much nicer with print in two different designs.

Download my designs right here. I mixed them a lot, as you can see from the backsides, but just one pattern can be varied, in alternating between which pattern you face outwards, in the first fold. 

2021: I have a new location for my downloads, and they are now to be downloaded one page at a time, but for results like in my images, pair the designs like I have, one for the front, one for the back.
A: red waves and dots:  FRONT  /  BACK
B: blue arrows and squares
FRONT  /  BACK
C: pink stripes and trianglesFRONT  /  BACK
D: blue waves and diagonals
FRONT  /  BACK
E: red snow and waves
FRONT  /  BACK
F: blue stars and dotsFRONT  /  BACK

Last but not least: the stars are really not hard to make at all, if you have just a little bit of origami experience, but I have not produced my own tutorial for these, since there is no way I could explain them as well as this patient Indian gentleman on YouTube. 


Happy folding, and have a great weekend.
 

12/07/2017

Teeny Tiny

Anyone struggling with the Fröbel Stars, I wrote about the other day?

I just found these in a matchbox in one of our boxes of Christmas tinsel. They most likely are made by my husband's brother, who is not quite like most people, when it comes to doing crazy complicated things with paper and scissors. His Easter letters and woven Christmas hearts are also really something else! I simply cannot imagine how he managed to finish those little tips....??

12/05/2017

Oh, those Plop Plop Balls...!

The most wildly popular paper project I have ever shared here, must be these: the so called 'Plop Plop Baubles' from December 2015. I just checked the blog backend, and I can see that the post have been visited almost fifty thousand times, and they are also the most re-pinned design I have ever put up on Pinterest.

I have had sweet messages in my Instagram mailbox, and have been tagged by others, who wanted to share their ploppy projects with me. See a couple of them here

Well, I'm so super glad to have shared something people seem to like - but the reason I take them up again, is that I saw that a popular Danish magazine have produced a video tutorial on them! 


It's on YouTube, right here.

That's great, because I would love to do video tutorials, but I simply don't have the time or the setup to do them - not right now, anyway.

And they also came back to me, because I just cleared out some of all the shoe boxes full of paper things I have produced for this blog. I usually keep just a few items for myself, the rest I give away as small host/hostess gifts in the holiday season - but I still seem to have boxes full of the stuff. 

So I decided to make some little gift bags for a very nice Red Cross charity gift shop we have here in Copenhagen, hoping they might bring in a few kroner for good purposes. If you are an over-producer of such things, as I am, you could do the same! 


12/01/2017

Star Parade on December first

The Fröbel Star is a Christmas classic in Denmark (but comes from Germany, read about it here), and although actually a bit complex, it is something most older kids and almost all the rest of us - who haven't given up on such frivoluos pursuits - can actually make. The procedure is a bit mind-boggling, and I must admit that every year I have to at least peak at at tutorial, and then my fingers seem to remember the rest. 

It is a brilliant little construction, and it's made from four folded paper strips. Basically you lock them into a four legged wheel, and then you fold four tips from one side, turn over and fold the four opposite tips from the other side. Then you fold the middle 'knot' - also consisting of four tips, then turn over and fold the middle knot on the other side. So the work has two processes, that you repeat twice, once on each side. When you know what you are doing, a star takes you about five minutes. 

I will recommend that you get some of the pre-cut paper strips we always use in DK. They are available from craft/DIY/hobby webshops internationally, and are a flat pack little product you could order cheaply online to, I would guess, almost anywhere in the world. They come in all imaginable colours and prints - and the ones I have used here are 15, 20 and 24 mm. 


So, that was a lot of words. And here's the thing: I have tried so many fun variations of these, that I decided to do this blog post dedicated to the Paper Strip Stars - in all the varieties I have tried.

First I will show you the Fröbel Star variations, and I will include links to the best tutorials and videos I have found, and they have all been tested. The examples I have folded for these photos, are made with only one middle knot finished, that way they are flat and easier to photograph. Such one-sided stars are, of course, also great for decorationg the table, gifts etc. - and you make them by simply not doing the middle bit on one side, and just cut off the excess strips.


THE BASIC FRÖBEL STAR

I posted something about these some Christmases ago, and included a rather poor tutorial - but I think I have found a much better one: It's from a place called www.danishthings.com and if you click on the image, you have a high res, very thorough photographic guide. Find it here.

If that one doesn't do it for you, I can recommend this one from Starfolds.dk.


FLAT FRÖBEL STARS

These I know in three variations. A: with the straight crossed middle / B: with the diagonally crossed middle and C: a fun variation, that looks different on each side.  

Starfolds explains A and B - in Danish, but with photos, and probably very google-translatable simple written instructions. 

The Craftables shows the C variation in English and with photos. 


FRÖBEL STAR WITH ROSEBUD MIDDLE
 
This very pretty variant, I have found on a danish blog as well - and there is a very detailed series of photos, but it's a slightly more tricky way to do the middle. Pay close attention to what happens in the photos, and you will get it right. I did! 


FRÖBEL STAR WITH PYRAMID MIDDLE 

Actually the simplest way you can finish the middle tips, and almost considered cheating! But it looks nice too. Find the tutorial right here.

//

In the top image you may have noticed some stars that didn't quite look like the Fröbel Stars. I have included them, because they are fun, and you make them from the same pre-cut paper strips we all use in Denmark.
  
SOFT BOW STARS

These are made with three strips, and are very easy. See a great video right here!


BOXY STARS

These are a kind of variation of the ones above, but they come from a copyrighted e-book, so I won't share the tutorial here - BUT warmly recommend that you spend the 60 dkr / 10 dollars / 8 euro it costs, as I believe in supporting my fellow paper enthusiasts. It's in Danish but the tutorials are very well presented, and easy to follow.


//

So, hoping I haven't exhausted you utterly already, I hope you are ready to get to work.

A great bit of advice, is to be patient at first - and remember that the principle of the Fröbel Star is such, that you sometimes happen to make a 'reversed' star (it depends on how you lock the first strips in place) - so if you can't seem to make the tutorial work, sometimes you simply need to reflect or flip the image (whether in your head, or in Photoshop) and try again. Did that make sense?

Now try for yourself! They are addictive and fun.

4/13/2017

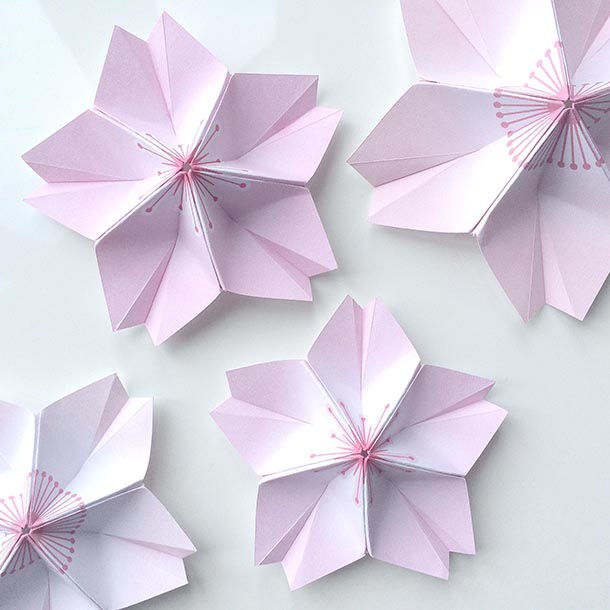
Origami Cherry Blossoms

This year Easter and hanami (Japanese for the season of blossoming cherry trees) coincide. So my paper-diy-project Easter egg gift for you, is a very pretty origami cherry blossom. These are quite large, and would look great as table decorations.

There are countless ways of folding a sakura with five petals, but I did a little research, and I think this one is both pretty, easy to make - and it has all the right characteristics of the cherry blossom, like the star shape and that lovely little dent each petal has. Find the tutorial and my special paper, after the images.


These are modular origami, you need to fold each petal individually, and then assemble them. Once you get the hang of it, you may experiment with the dent (the extra fold in the petal, that gives it shape), you can fold that in many ways - and you could also make flowers with much more than five petals, using the same principle.

You'll need glue for these, otherwise they are all over the place!

I made two slightly different designs, and two sizes : about 12 cm. and 8 cm. - or you could scale the design and make miniature versions of them, they are not complicated to fold. Download and print the special paper, that has two flowers of each size and design, right here: Get the PDF

2021: I have a new location for my downloads, please go here:
Large A
  /  Large B  /  Small A + B


Happy folding, happy Easter, happy Hanami or perhaps just spring!

3/22/2017

Yellow

When Easter is near, the color yellow is everywhere. Such a feast for the eyes! I love yellow. Back in the Easter 2015, I made yellow himmeli from plastic straws and a bit of yarn. And my son got a yellow helium balloon at some event. It even had eyes...

Last year, I was very busy around Easter, and only found the time to post something about these paper flower balls I made, when Easter was long over. 

So I'll re-post them here - they are a yellow and slightly re-designed version of these. I made them a bit smaller, and more buttercup like, and they are super easy to make. They consist of 12 identical petals with slits, and you just slide them together, to form a ball. Add a string if you like, and hang them from a pretty branch.

Print the petals on regular A4 paper - and print on both sides of the paper.  

Get the PDF here, with printing instructions and all.
 
2021 update: find links for the downloads in the post from 2016.


2/13/2017

You should definitely heart someone

Tomorrow it's Valentine's Day, and I think we should absolutely spread some love around.
The world needs it.

Last year I showed you how to make Japanese folding letters for Valentine, menko and tato, and made you a hidden heart origami letter. This year I thought these might be fun....


They take five minutes to fold, and are made from a regular A4 sheet, so you don't even need to worry about square origami paper! I made you a PDF with a lot of red/pink patterns, and scaled the A4 dimensions a bit, to work around those unprinted edges all printed sheets must have. Just grab your scissors and cut away that edge.

Here's a tutorial: A4 origami hearts       And here's a PDF of 12 pretty designs to use, if you like

2021: I have a new location for my downloads, please go here for the tutorial: page 1  /  page 2
I have made a Flickr folder with the 12 design sheets, feel free to download: it's right HERE

Write a nice message to someone you think needs a bit of love, and fold it like this. Or use them for parties, wedding invitations or Christmas ornaments. I made a whole bundle, as you can see, and they ended up as a garland. They are actually very well suited for garlands, the construction has a natural  slit to pull the string through, you'll see for yourself when you try.

Wanna see my garland?