Showing posts with label christmas tree. Show all posts

12/21/2017

Holiday spirits-ish

Even though I am technically only semi-employed and freelance working at the moment, it feels great to be able to say: Finally Christmas vacation and a bit of peace and rest! Or not quite yet, that is. Today we are having a party at our house, tomorrow it's office Christmas parties, Saturday it's going to be all about (I suspect) slightly panicky shopping - and then there's the big to do on the 24th.

But then, perhaps? All I wanna do is take a long, long walk, some place beautiful and quiet, without shopping bags or places to be at a certain time.

I love this photo, I found it on Flickr a long time ago. It's by Manuel Raposo, and appears to be taken in Salzburg. I want to be in that photo.

12/23/2015

Origami top star - or at least I tried!

Yesterdays several attempts to make a sort of oversize octahedron star to put in the top of our small and over prized Christmas tree, resulted in one star that was too soft and fragile, one that didn't stay in shape because the paper was too plastic coated, and one that was almost impossible to make, because the paper was too thick. But still, they were kind of pretty, I suppose.


The small one is the one from the other day, made in 15 x 15 centimetres paper. The white one with gold leaf paint, was the one that was veeeery hard to fold, because the paper was so heavy - it's made in 30 x 30 centimetres scrapbooking paper from the hobbyshop, because I didn't have any A3.

But the gold paint looks rather nice. If you want to decorate the tips on this kind of star, you should do it when you have done all the horizontal and diagonal folds, but before you do the last folds - like this:


This size of paper makes a star about 11 centimetres in diameter. I found it a bit too small for the tree, and started digging in my wrapping paper supplies, and found some paper from IKEA and some from the Tiger Stores, that looked festive. I made 45 x 45 centimetres squares for the large ones, and the finished star is about 17 centimetres in diameter.

These had a nice size, but upscaling origami is always hard. It is as if the larger surfaces become too heavy and pull the paper in all the wrong directions. But I managed two large stars that didn't fall totally apart:

And finally, after much wiggling and twisting - and taping a pencil to the top of the tree - I managed to top our odd looking little tree (it has clusters of crooked branches with too much air in between and was insanely expensive) with this one! 

So a merry merry 'Lillejuleaften' (= Little Christmas Eve) as we say in Denmark, to all of you out there.


12/19/2015

Origami flashback: Katrine's tree

It has been a madly busy December for me - I started a new job just a few months ago, and that has been a great experience, but also something that has had the most of my attention, obviously. I do, however, sit in the evenings and empty my stressful head with origami. And tomorrow, fourth Sunday in Advent, of course I have another little DIY project for all of you out there, likewise inclined to find it detoxing, de-stressing and just plain cosy to sit and fold pieces of pretty paper. And tomorrow it will be more origami, because that is my favorite paper thing at the moment!

My fondness for origami started with an English teacher, Ellen, who laid the foundation for my love of the English language, who taught us that when in Australia you should always check your shoes before putting them on (for deadly spiders etc.) - and how to fold the classical crane, the tsuru.

For years it was the only origami I knew how to do, but the lately have I just started to browse for cool little origami things, that would work well as Christmas and Easter decorations, and that has been just such fun. It has turned into several things you can pick up here on this blog - check my full list of DIYs or my Pinterest paper design board.

Last years obsession was definitely these - and my friend Katrine really took that craze to the next level! She literally made hundreds of them, and made them in a very nice way, putting a bit of wire and some pearls through the paper form, a very pretty way of hanging them.

Let me show you her fabulous tree, dedicated to only origami, even the top star - and stay tuned for tomorrows origami project!


1/06/2015

Epiphany or Twelfth Night and absolutely no more Christmas for now

Today, January 6th, is traditionally the last day for Christmas trees, elves and tinsel. We haven't quite gotten rid of all of it, but almost. Our tree is still in a corner, looking like a hung over drag performer or some such thing. It was more or less demolished on New Years Eve, where we had a fairly crazy dinner party, and the young ones sort of bombarded it with paper confetti poppers and glitter streamers. It survived, however, in an almost prettily trashy way. Now it is completely dried out, and I just know that if I attempt to lift it, every one of its needles will drop to the floor. Just couldn't be bothered today. Maybe tomorrow.

I will post the last Christmas reference for this season - this photo of a Christmas tree I took Saturday in SMK, the great art museum here in Copenhagen, where it was still standing in the beautiful sculpture hall, looking pretty. Two bits of cardboard can make a nice tree, indeed (no needles to worry about), and all the decorations are made in the children's workshop. I find it adorable.


With this, I will thank you all, for visiting the blog during November and December, and for all the nice feedback I have gotten on my creative projects this (= last) year. Keep coming back, if you feel like it, because I will be blogging on, as I did last year (for the first time), about all kinds of other topics that take my fancy.

So see you later, right?

12/24/2014

Merry Christmas, everybody!


Remember the advent gift wrap? It has been a great hit with my son - and I hope some of you out there have used it as well. We have had lots of fun and daily discussions about numbers, and most particularly about how different they might look. Very educational, but not boring, I would say!

I actually hardly remember what I wrapped in these last two, but the rattling teeth and the Playmobil lumberjack, were in there, sometime in December.

And here is our tree. Atopped with candy stripes, and adorned with this and that. Now for a late breakfast, and then I need to wrap some gifts. 

Merry Christmas to all my readers, everywhere in the world.
I wish you all peace and some quiet days and time to enjoy the company of someone dear to you.

12/23/2014

Superstar

The last four days have been non stop activities and driving around for visits and shopping, but now all we need to do is trim the tree and sleep late and eat a slightly unhealthy breakfast in our pajamas. And here is what I made last night.


If you have some time over for a little crafting project today why don't you make one as well? It's a stripey superstar! I made a woven top star for the tree a few years ago, which have been used since, but we have a really giant tree this year, so I felt like making a new, slightly more outrageous one. And I just looove red/white stripes.

You download these two designs - one for the star center and one for the star beams.

(here you see all the beams plus the center bit unfolded, and how it looks when it's folded and glued)

You need to make 20 of the pointy things (so print 5 copies of that design), and one center bit - and then you simply glue the 'beams' - as I have decided to call them - onto the center, which is easy and quick. As usual I would say it pays off to cut very precisely, and trace all the lines lightly before folding them. Simply drag the tip of a sharp knife or a needle lightly along the lines (use a ruler), don't cut through the paper of course. And the folding will be so easy! If you make this a top star for a tree, leave out one of the pointy bits, and gently cut a hole in the center bit instead. And the star sits just fine on the top branch. Of course you could make it a big hanging ornament, or a standing paper sculpture as well! 

The finished star is approximately 25 centimeter in diameter. It took me a bit more than an hour to make it, and it is not at all complicated, just a little bit boring to make those twenty beams - but it will be worth it! I recommend printing on 90 or 100 g paper, as the more common 80 g will be too soft.

Have a lovely December 23rd...


12/01/2014

Hey, it's December 1st! Let's make trees.

Hello everybody! It is December 1st, and Christmas is officially the theme of this blog for the next many weeks. I will try to post often, though perhaps not every day, and this year I will try to post a few projects especially for kids, or those of us who like very, very simple projects. 

So let us begin with one of those!
(And I do promise some comlicated-looking-but-actually-easy paper things as well, just as usual....)

For newcomers to this blog: My DIY's have a sort of general philosophy. They are nearly always paper designs, and simple and straightforward to make, though sometimes they require a steady hand. But that's about it. I try to do the thinking for you as often as possible, and usually you just have to print, cut and follow easy instructions. 

I start with something completely different, however, because already the other day, I talked about Hama Beads. And since we have been at them for weeks (they never leave the dining room table), I started making these little green trees, and the little plantation just grew and grew. We kinda like them, and my son, aged five, made the smaller ones. They just require a large square pegboard, and some counting skills. You could add colored beads for tree decorations and perhaps even add a star to the top. It's not that I in any way came up with this idea, but perhaps I made it a little bit simpler for you, if you save (it's just a gif) and print this diagram. 

They are a little bit different that the 'flat' Hama ornaments, and my son found it fascinating that it was so easy to make something 3D. We had a lot of different green colors, but they would look so cool in reds and pinks - or whatever you like!


1/06/2014

Hellig Tre Konger / Epiphany / Twelfth Night - and goodbye tree!

Today is the very very last day of christmas - Epiphany or Twelfth Night - and in Denmark we mostly remember this date because it is, traditionally, the last day you are allowed to enjoy your christmas tinsel. On January 6th it has to go! I guess lots of people get rid of it much sooner, and we too put away most of the elves and advent candlesticks and such, but I tend to stick with the tree - if we have one - to about this day. We always buy one just a few days before Christmas Eve, and christmas trees are ridiculously expensive if you life in a big city in Denmark (and cost next to nothing if you live in the countryside) so I cannot bring myself to throw it away. Plus, of course, it looks festive.

This is what ours looked like about three days ago....
It got stuck in a strange and messy corner this year, and does its very best to cover up our semi stowed away CD collection. 


Yesterday it got to the turning point of its lush looking greenness - it just kinda lost all of its needles at once, so today it just looks sad and creepy. I de-tinselled it this morning, and when my son is back from kindergarten, he gets to see it thrown over the balcony all of four stories down! Mustn't miss that.

Thank you ALL for following my blog this December, there were visitors from the most exotic places, from Egypt to Japan, hope you will check it out again. I just started on Pinterest, so you can find me there as well. Not much happening there yet, I have to say, but it will grow, I'm guessing.

The very last christmassy thing I will do this time is to show you this years edition of My Favourite Window!

I have shown you this window the two previous seasons - see the one from 2011, and see the one from 2012 - and this year my friends down the street, came up with yet another twist on their beautiful annual holiday paper snowflake window.

And it looks lovely again this year. With this I will wish you all a Happy New Year!


12/22/2013

A little tree and some lame excuses

Hi everybody! Here we are suffering from some bloody inconvenient tech troubles, so the cute little paper project I was going to share and upload today, is going to have to wait. Otherwise it is a very fine day, perhaps the first sunny day in weeks, à propos the winter solstice yesterday.

Instead, I will show you my sons christmas tree, complete with polar bears and maneki-neko, and see if  we can get the wi fi or printer installation or whatever the heck the problem is, up to speed again.


12/22/2012

Window dressing

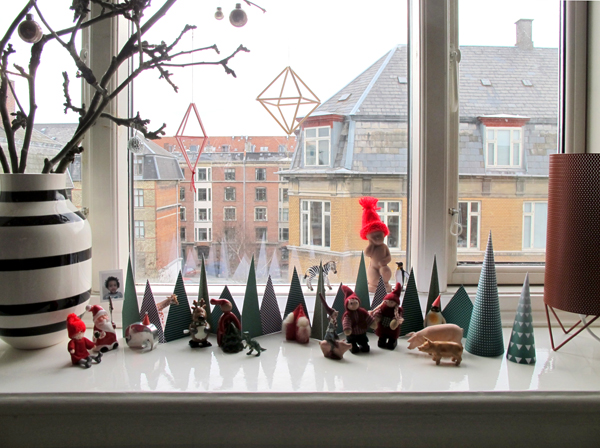
Better late than never, I say. Our window is now inhabited by a sort of global peace and harmony picnic.
Zebras, christmas elves and penguins are joyfully singing along.

I made the tree backdrop the other day, not thinking that the cone trees were enough.
So if you are up to a bit of last minute christmas landscaping in the window, I give you  
a row of suitable trees right here. Print them on heavy paper, 120 g. or more, if you have it.


The little clay boy next to the zebra is piece of artwork, by Morten Jacobsen, my brother-in-law.
He made these crude clay castings of fine porcelain figurines from his childhood home in his  
Memorabilia project, and I was very thrilled to find a small wolly hat for him.
So right now he is a part of another art installation, of sorts. Very mixed media.
He will be released again after Christmas.

12/02/2012

Wow

We woke up to this. Which makes it far easier to get in the mood for advent 1st. Pretty, huh?
Snow is not something we can automatically expect in Denmark, so we enjoy it a lot.
Sleighs, skis and big boots are taken out immediately, as we know the lot might be gone again
by tomorrow. We also complain madly about it, but that's just us Danes.


Should you be more inclined to stay indoors today, you might make yourself some nice cones,
just like these, that I made for you. That is a soft start, no?
You may stick a sprig of pine in them, or just leave them as they are. I made them in red and green,
so voilà - they are little trees as well, if you like. Find the link a bit further down....


Ombré cones or trees: Click here

I must like trees as decorations - last year I crocheted them, and made the twirly ones!

2021: I have a new location for my downloads, please go here for the cones / trees:
red A  /  red B  /  green A  /  green B

12/22/2011

We've got balls!

My friend and client Karina just dropped by for a meeting and a coffee.
She brought me these darling little snowballs, she made them from delicate paper yarn.

She is this cool textile designer, working in industrial materials such as steel, nylon and polyester,
but at this time of year she lets out her inner christmas nut, and makes lovely christmas things.

She also shows us her christmas tree on her blog - check it here....


12/21/2011

The Star

Your project today is a star for your tree, naturally! This one is made from three or four 'hearts' -
which they aren't exactly, as you will see - you glue together, to form a starry paper hat, and it does
look kind of neat, I think.... I like my decorations flimsy and light, and I think some of the metal top ornaments are a bit too heavy sometimes.

Download your make-a-star kit here.

2021: I have a new location for my downloads: please go here for tutorial and here for template

I never made this before, so in my little tutorial on page one, it says make four of the pointy hearts -
but actually, as I found out today, that two or three make a nice star as well, depending on how you
glue them together. Leave all the points free of glue, and fluff them a bit, to bring out the 'paper-ness'
of the finished star.


O Tannenbaum

We got the tree. And now I think it looks so nice, it would be almost wrong to put anything on it...


As you can see, I have an alternative baum in the background, much more suited, I might add,
to actually hang decorations on. Those thick, stubbly fir or pine branches are hard to decorate, but
have no fear: We will get to that.

In fact I promise to return in a couple of hours with something quite essential for the tree.
Keep an eye on this space.

In the meantime, I want to show you Berit's tree.
Berit is a great lady in the family, who is a firm believer in both christmas and in adorning your house
with gusto at this time of year. She has the best trees.
She gets a very large tree (and is fortunate to have a living room with some ceiling height to it) and
puts every single bit of decoration the family has, small and large, old and new, on it.
Can you spot the Hama beads?


Personally, I tend to go for a smaller tree (this is a practical necessity) and a more bare look.
But glamorous over-the-top trees make me happy! Below are a few snaps of various trees -
The first one is from a Polish shopping mall, where you actually couldn't see the tree itself (although
I suppose it was in there, somewhere?) - and then one at the waterfront in Gamla Stan, Stockholm.
The last one, Rockefeller Centre, I didn't take myself - but spending christmas in New York seems
a lovely, romantic thing to do. Maybe someday?
I'll definitely take my ice skates, then.


12/15/2011

Green paper trees


These are really pretty and very easy to make - but you have to forgive me for the not so interesting photographs. The sky is dark grey here in Copenhagen today, and taking pictures indoors was close
to impossible. This is what natural light I managed to find....

They are flimsily cute, very 3D and turn and twirl at the slightest little movement in the air. 

I made you a two page design, that is meant to give you print on both sides of the paper, as that
looks so much better with these, because you see them from all sides....
Set your printer to print only page one, and then take your prints, turn them over, put them back in
the tray - or in the hand feed tray - an then print page two. Real easy.

Start a little pine forest here.

2021: I have a new location for my downloads: please go here for the front print -
and here for the back side print (it's a print-on-both-sides design)


12/09/2011

Smells like christmas spirit


Yesterday was such a nice day, and I ended it with a fun and totally improvised pizza dinner with
a whole bunch of great people - in all ages! The older kids made hearts in abundance, and the
sweet lady of the house took a particular fancy to my use of Wunderbaums - so todays heart is a
special edition: The new Wunderbaum Hearts - download them here.

2021: I have a new location for my downloads: please go here (A) and here (B)

The Wunderbaum is a crazy, kitschy thing, to most of us - but it has an adorable sort of 'generic tree'-
outline, and I frequently buy them as silly gifts.

Read more about this little house plant here...

11/30/2011

Trees

I don't feel quite ready for the full xmas monty yet - it's always like that.

But it is coming. In some shape or form. Such as the sudden urge to crochet little trees.
So, yeah, I made these (with styrofoam cones from the hobby shop, and olive jar lids to give them
a bit of stamina) and the question is whether they will be encircled by dancing elves or topped by
golden stars in a few days. I do get carried away. I love a corny christmas window, like the ones from
my childhood with a small village of odd sized creatures, gathered around a lake (= a mirror) in the
cotton wool snow. And the church - with the little candle in it... Sigh.

But right now, these are just green and quietly tree-like.

Don't forget to check the first heart tomorrow....!